Drywall Repair
Drywall Repair
Ever walked by a wall in your house and noticed a dent or hole that wasn't there before? It's a frustrating sight, but don't worry, you're not alone. We've all been there and it's easier than you might think to fix it yourself.
This article is here to guide you through the process of drywall repair. You'll learn how to:
- Identify the damage
- Gather your tools and materials
- Prepare the area
- Apply the patch
- Add those finishing touches that make it look as good as new.
So roll up your sleeves and let's turn this into a DIY project! You'll be part of a community of homeowners who take pride in maintaining their homes themselves.
Let's get started on making those walls flawless again!
Key Takeaways
- Accurately identifying the type and extent of damage is crucial for effective drywall repair.
- Having the right tools and materials, such as a drywall saw, trowel, and quality drywall sheets, is essential for a successful repair.
- Proper preparation, including cleaning the area, removing debris, and checking for mold, is necessary before starting the repair process.
- Applying the drywall patch and joint compound with precision and patience, as well as sanding the repaired area for a smooth finish, are important steps in achieving a seamless blend with the surrounding wall.
Identify the Damage
Before we dive into the actual repair, let's first accurately identify what kind of damage we're dealing with on your drywall. It's more crucial than you might think!
As part of our little community here, I'll guide you through this process. With a careful Wall Inspection, you can pinpoint the Damage Types. Are there cracks or holes? Maybe water damage or mold? Or perhaps some peeling paint is what caught your eye? Each type requires a slightly different approach in terms of repair.
So, it's extremely important that together we correctly determine the type and extent of the damage.
Now that you've mastered identifying damage like a pro, let's make sure you have all the necessary tools and materials for your drywall repair journey.
Gather Your Repair Tools and Materials
To fix that pesky hole in your wall, you'll need the right tools and materials. A task like this isn't just about mending a hole; it's about creating a seamless blend with the rest of your wall.
Now, let's talk Tool Selection Tips. You'll require a drywall saw or utility knife for cutting, a pointed trowel for applying joint compound, and sandpaper for smoothing out the repaired area.
Material Quality Importance cannot be overstressed here. You want quality drywall sheets and high-grade joint compound to ensure resilience and longevity.
Remember, we're all in this together - making our homes better places. So after gathering everything needed, it's time to focus on getting the damaged area ready for reparation – ensuring we restore not just walls but also peace of mind at home.
Prepare the Damaged Area
Before you get started on the actual repair, it's crucial to properly prepare the damaged area.
First off, thoroughly clean the area to ensure no debris or dust will interfere with your work.
Then, using a utility knife or drywall saw, carefully cut out and remove the damaged section of drywall.
Clean the Damaged Area
Gently scrape away any loose or peeling paint from the damaged area, ensuring it's as clean and smooth as possible before moving onto the next step. It's crucial to also keep an eye out for mold, a common issue in damp environments. Safety precautions should not be overlooked; always wear protective gloves and goggles while cleaning.
| Materials | Purpose | |
|---|---|---|
| 1 | Scrapper | Remove loose paint |
| 2 | Gloves | Protect hands |
| 3 | Goggles | Protect eyes |
| 4 | Mold prevention spray | Prevent future mold growth |
| 5 | Damp cloth | Wipe down area after scraping |
After you've thoroughly cleaned and prepped the area, you'll have created an ideal surface for repair. Ensuring that every nook is free of debris will make your repair job seamless. Now you're all set to tackle the task of cutting out the damaged section with precision and care.
Cut Out the Damaged Section
Now it's time to play surgeon and meticulously remove that pesky damaged section. This is where your damage assessment skills come into play. You need to be precise, ensuring you don't cause further harm to the surrounding drywall.
Start by outlining the damaged area with a carpenter's square for precision, creating a rectangle or square shape.
Next, using a keyhole saw or utility knife, carefully cut along the lines you've drawn. Remember, less is more here; you can always trim more later if needed.
Once done cutting, gently pull out the damaged piece of drywall.
These are some basic replacement techniques that'll make your wall look as good as new in no time! Now let's move on and give your wall an upgrade with the application of a fresh drywall patch!
Apply the Drywall Patch
Now that you've prepped the damaged area of your drywall, it's time to move on to applying the drywall patch.
First, you'll need to secure the patch properly so it holds up over time.
Then, you're going to apply a layer of joint compound which will help blend in your repair with the rest of the wall.
Secure the Patch
Securing the patch is a straightforward process that can transform an ugly hole into a distant memory. It's like being part of a community of skilled craftspeople, each leaving their mark by restoring beauty where damage once was. The key lies in the choice of adhesive and how the patch is reinforced.
Adhesive selection is crucial; it's important to opt for an adhesive that bonds well with drywall. Patch reinforcement adds stability, and mesh tape or paper tape can be effectively used here. These should be smoothly applied over the patch, ensuring there are no wrinkles or bubbles.
By following these steps, not only will you fix the issue, but you will also seamlessly merge with the surrounding wall. You become one with a long line of people who have turned their houses back into homes. With your patch now secure, it's time to dive into applying joint compound, as if joining the ranks of professional plasterers!
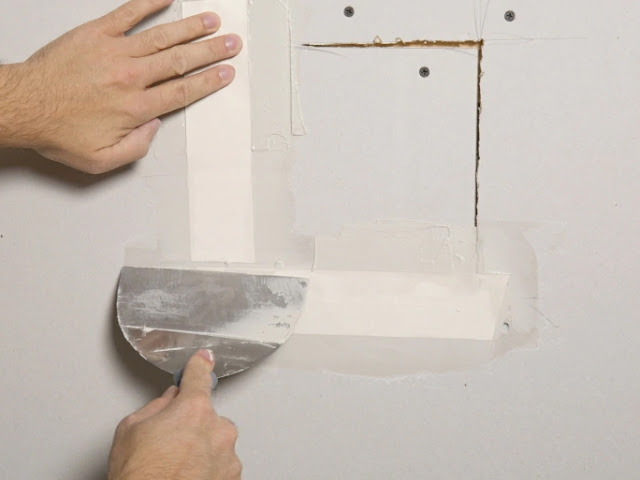
Apply Joint Compound
Applying joint compound can feel like donning the hat of an artisan, molding and shaping until your wall's imperfections vanish beneath a smooth surface. You're not just fixing a wall; you're joining a community of do-it-yourselfers who take pride in mastering their own homes.
First, ensure the compound consistency is just right - it should be thick enough to stick, but thin enough to spread easily. Using a taping knife, apply the compound over the patch and beyond its edges. This process, known as joint smoothing, will help blend the repair into the rest of your wall.
Remember to take your time during this stage; perfection isn't achieved overnight. But with patience and practice, you'll perfect this craft like many before you have done.
Now that you've applied the joint compound, let's move on to adding those finishing touches that make all the difference in any home improvement project.
Finishing Touches
Now that you've applied the drywall patch, it's time to give it the perfect finish.
You'll first need to sand the repaired area until it's smooth and blends seamlessly with the rest of your wall.
Once done, grab your paintbrush because we're going to paint over that patch, making our repair virtually invisible.
Sand the Repaired Area
Once the drywall compound has thoroughly dried, it's time to transform that rough patch into a smooth, seamless surface with a bit of sanding. It's crucial to use the right sanding techniques and have effective dust management practices in place.
- Start your sanding process gently; don't apply too much pressure as you might make unnecessary indents or scratches on your wall.
- Keep a vacuum cleaner or damp cloth handy to manage dust efficiently. Remember, we're all part of this DIY community and keeping our workspaces clean is an essential part of belonging here.
- Use a bright light source to highlight any uneven spots that may need additional attention.
Now that your wall is smooth and ready, let's prepare for the next exciting phase - bringing color back into the room with paint!
Paint the Repaired Area
Isn't it thrilling to think about how a fresh coat of paint will breathe new life into your space? It turns the once damaged area into a beautiful canvas. The color selection is crucial for this phase. It's not just about picking the right shade, but also about choosing a color that makes you feel at home.
Let's dive into paint types. Latex and oil-based paints are popular choices for drywall repair. Both have their pros and cons. Latex is easier to work with, while oil-based offers durability. Your choice might depend on the room's usage, personal preference, or even environmental factors.
Remember, we're all in this together! Painting isn't just about covering up flaws. It's a chance to express yourself and create a space where everyone feels they belong.

Frequently Asked Questions
How long does it normally take for the repaired drywall to dry completely?
Choosing the right drywall material and analyzing repair costs influence drying time. However, for your repaired drywall to completely dry, it typically takes 24-48 hours. Remember, perfect results take patience and care.
Can I paint over the repaired drywall immediately after the repair?
You're eager to see the finished look, aren't you? However, paint quality effects largely depend on drywall priming necessity. You can't paint immediately; ensuring the repaired drywall is fully dried and primed is crucial.
Is it safe to do drywall repair by myself, or should I hire a professional?
Absolutely, you can tackle drywall repair yourself, buddy! Just make sure your tool selection is on point and you've got the required safety gear. But remember, there's no shame in calling a pro if needed.
How often should I inspect my drywall for potential damage?
You're part of a community that values home upkeep. Look for damage indicators in your drywall regularly. It's best to do this inspection every six months, ensuring you catch potential problems early on.
Are there any specific precautions to take while repairing drywall to prevent further damage?
Absolutely, to prevent further damage when repairing drywall, choose the right drywall material. Also, estimate repair costs accurately. It's like you're part of a special team keeping homes healthy and well-maintained.